Switching From Windows To Linux


Why Linux?

  1. No more worries about viruses

  2. No more hanging and periodic restarts

  3. More protection to your computer

  4. Save money don't pay for OS any more

  5. Freedom from proprietary stuffs, edit as you wish

  6. Install OS and necessary applications on the move.

  7. No more yelling on driver guide

  8. Update all your software in a single click

  9. Why copy software illegally? It all your own, don't worry about police raids.

  10. Search new softwares from Linux itself.

  11. Always be up-to date with new generation desktops

  12. Chose your desktop as your wish

  13. Enjoy free and unlimited support

  14. Worried about bugs, fix yourself or get faster response from developer's

  15. Enjoy free gaming

  16. Chat with all buddies inside one messenger


Ubuntu is best for beginners because of it's simplicity and graphical environment.

This Gnome-based operating system that is perfect for laptops, desktops and servers. It contains all the applications you need a web browser, presentation, document and spreadsheet software, instant messaging and much more.


Why Ubuntu


Ubuntu is an entirely open source operating system built around the Linux kernel. The Ubuntu community is built around the ideals enshrined in the Ubuntu Philosophy: that software should be available free of charge, that software tools should be usable by people in their local language and despite any disabilities, and that people should have the freedom to customize and alter their software in whatever way they see fit. For those reasons:

  • Ubuntu will always be free of charge, and there is no extra fee for the "enterprise edition," we make our very best work available to everyone on the same Free terms.

  • Ubuntu includes the very best in translations and accessibility infrastructure that the free software community has to offer, to make Ubuntu usable for as many people as possible.

  • Ubuntu is released regularly and predictably; a new release is made every six months. You can use the current stable release or the current development release. Each release is supported for at least 18 months.

  • Ubuntu is entirely committed to the principles of open source software development; we encourage people to use open source software, improve it and pass it on.

Find out more at the Ubuntu website.


Ubuntu Installation

Install Ubuntu without altering your current Windows


How to install Ubuntu from a CD

For a linux beginner its really easy to install your first Ubuntu. Get Ubuntu CD image by downloading from here, or request Request free CDs (Shipit). I prefer you must have the latest version of Ubuntu (Jaunty Jackalope 9.04). You can install Ubuntu straight from the CD inside Windows or by booting your computer from the bootable CD.

First you have to write the downloaded image in to a cd ROM. Nero buring rom or Roxio will do it for you. If your not aware of these programs go here to have a look at this article which tells how to burn an ISO image.

ALWAYS perform a backup before any partitioning operation. This is particularly important when moving a partition, or shrinking a partition from the left side. The left side of a partition is generally where most or all of the data resides. The right side is generally free space. But it important before performing ANY partitioning operation involving already existing partitions.

You need to create some free space in your hard disk in order to install the Ubuntu, to do so firstly check for your hard disks partitions, go to disk management.

If there is unallocated space if its enough for your new linux operating system (you need at least 5GB of free space) simply close the application.

If there is no unallocated space, you can reduce another partition to make unallocated space with free partition editing tool.


I). Installing from the bootable CD.

1. Boot your computer from the CD.

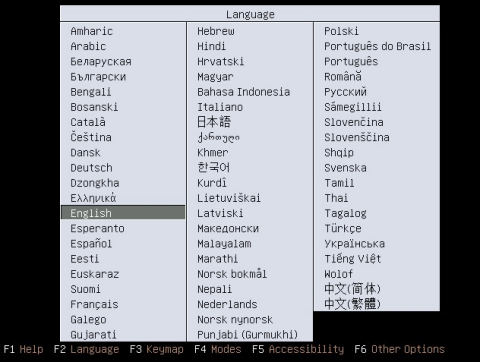
  1. Start or restart your computer. The Language screen appears. If you reboot your computer and do not see the following screen, please refer to BootFromCD Install1Language.png

  2. Select your desired language and press Enter. The startup window appears. Install2StartUp.png

  3. Select Install Ubuntu and press Enter. The Welcome window appears. Install3Welcome.png

  4. From the taskbar, choose your preferred language. Click Forward. The Where are you? window appears. Install4WhereAreYou.png

  5. From the Selected city box, choose your closest location. Click Forward. The Keyboard layout window appears. Install5Keyboard.png

  6. Select your keyboard layout. To test if you have chosen the correct layout, enter characters in the text box. Click Forward. The Prepare disk space window appears.

  7. If you want to install Ubuntu over your entire hard drive, then Select Guided – use entire disk and select the hard drive that you want to install Ubuntu. Click Forward. The Who are you? window appears. Install7DiskSingleBoot.png

WARNING: Installing Ubuntu on your entire hard disk will erase all data that is currently on the drive. Including your existing windows installation.

Go here for custom partitioning.

OR

  1. If you want to install Ubuntu on a single partion Dual Booting, Select Guided – resize. In the New partition size area, drag the area between the two partitions to create your desired partition sizes. Click 'Forward. The Who are you? window appears.

    Install8DiskDualBoot.png

  2. In the What is your name? field, enter your name.

    Install9WhoAreYou.png

  3. In the What name do you want to use to log in? field, enter a login name.
  4. In the Choose a password to keep your account safe field, enter a password in both text boxes.
  5. In the What is the name of your computer? Field, enter a name to identify your computer.
  6. If you are the only user and wish to avoid the login screen, check Log in automatically (optional).

  7. Click Forward. The Ready to install window appears.

    Install10ReadyToInstall.png

  8. Verify that the language, layout, location, and personal information are correct and click Install. The installation wizard begins.

  9. When the installation wizard finishes, the installation complete window appears.

    Click Restart now to restart your computer. Ubuntu is now installed. Install11InstallComplete.png


II).
Installing Ubuntu from within Windows


Check if your hardware works with Ubuntu and meets the minimum system requirements. (see SupportedArchitectures, HardwareSupport and Installation/SystemRequirements)

Wubi

Installing Ubuntu from within Windows

The Windows-based Ubuntu Installer (Wubi) allows you to install and uninstall Ubuntu from within Microsoft Windows. It lets a Microsoft Windows user try Ubuntu without risking any data loss due to disk formatting or partitioning.

Wubi requires Windows 98, 2000, XP, Vista, or Windows 7.

NOTE: Hibernation is not supported when installing Ubuntu via Wubi.

To Install Ubuntu:

  1. Within Microsoft Windows, insert the Ubuntu installation disc into your CD drive. The Ubuntu CD Menu appears.

    alt Wubi installer

  2. Select Install inside Windows. The Ubuntu Setup window appears. alt Wubi setup

  3. In the Installation Drive list, select the drive that you want to install Ubuntu.
  4. In the Installation Size list, select the amount of space that you want to allocate to Ubuntu.
  5. In the Desktop Environment list, select Ubuntu.

  6. In the Language list, select your preferred language.
  7. In the Username box, enter a username for your Ubuntu account.
  8. In the Password box, enter a password for your Ubuntu account. Repeat this password on the second line.
  9. Select Install. The Ubuntu Setup progress window appears. When Ubuntu has finished installing, the Completing the Ubuntu Setup Wizard window appears.

    alt Completing Wubi wizard window

  10. Select Reboot now and click Finish. Your computer restarts and the Windows Boot Manager appears. alt Windows Boot Manager

  11. Using your keyboard’s up and down arrow keys, select Ubuntu and press Enter. Ubuntu loads and the Checking the installation wizard appears. Ubuntu is now installed.

NOTE: Since Wubi installs Ubuntu on the same file partition as Windows, there may be a slight degradation in Ubuntu’s performance over time due to file fragmentation.

Windows-based Uninstallation

When installed from Microsoft Windows, Ubuntu can be uninstalled using Microsoft Window’s standard Add or Remove Programs/Uninstall a program option.

To uninstall Ubuntu in Windows XP:

  1. From the Start menu, select Control Panel. The Control Panel appears.

alt Windows XP Control Panel

  1. Select Add or Remove Programs. Add or Remove Programs appears.

  2. Select Ubuntu and click Remove. The Wubi Uninstall window appears.

  3. Click Uninstall. Ubuntu uninstalls. The Completing the Wubi Uninstall Wizard appears.

  4. Click Finish. Ubuntu is uninstalled.

To uninstall Ubuntu in Windows Vista or Windows 7:

Removing Ubuntu in Windows Vista or Windows 7 follows the standard Uninstall a program option in Microsoft Windows.

  1. From the Start menu, select Control Panel. The Control Panel appears.

alt Windows 7 Control Panel

  1. Under Programs, select Uninstall a program. The Uninstall or change a program window appears.

alt Windows 7 Uninstall or Change a Program

  1. Select Ubuntu and then click Uninstall/Change. The Wubi Uninstall window appears.

alt Wubi is installed window

  1. Click Uninstall. The progress wizard appears. The Completing the Wubi Uninstall Wizard appears.

alt Wubi installer completed

  1. Click Finish. Ubuntu is uninstalled.


Selecting an operating system to boot

If you installed Ubuntu via the Wubi installer, the Windows Boot Manager loads. You can choose which operating system to run.

To choose an operating system to boot:

  1. Turn on or restart your system. The Windows Boot Manager appears.

    alt Windows Boot Manager

  2. Using your keyboard’s up and down arrow keys, select the operating system that you want to load. Press Enter. The desired operating system loads.
NOTE: The default operating system is Microsoft Windows. If you do not choose an operating system, Microsoft Windows will automatically load.

Getting started

Here I'm going to show you the necessary softwares you needed to go well with the Ubuntu, like multimedia players, instant messaging clients, web browsers etc.

1. VLC media player

The cross-platform open-source multimedia framework, player and server

VLC media player is a highly portable multimedia player and multimedia framework capable of reading most audio and video formats (MPEG-2, MPEG-4, H.264, DivX, MPEG-1, mp3, ogg, aac ...) as well as DVDs, Audio CDs VCDs, and various streaming protocols. See the full features list.
It can also be used as a media converter or a server to stream in unicast or multicast in IPv4 or IPv6 on networks.

If you like VLC, please rate it on the Freshmeat and versiontracker entries!


Here I uses terminal (command prompt in windows) for installing new programs.
To open terminal go Applications > Accessories > Terminal

From the prompt run the following command.
$ sudo apt-get update ( sudo command is to get admin (root) privileges for the user)
$ sudo apt-get install vlc vlc-plugin-esd mozilla-plugin-vlc (it will ensure installing all necessary plugins to be installed with it)

2. Pidgin Internet messenger


Buddy List

Pidgin is a chat program which lets you log in to accounts on multiple chat networks simultaneously. This means that you can be chatting with friends on MSN, talking to a friend on Google Talk, and sitting in a Yahoo chat room all at the same time.

Pidgin is compatible with the following chat networks out of the box: AIM, ICQ, Google Talk, Jabber/XMPP, MSN Messenger, Yahoo!, Bonjour, Gadu-Gadu, IRC, Novell GroupWise Messenger, QQ, Lotus Sametime, SILC, SIMPLE, MySpaceIM, and Zephyr. It can support many more with plugins.

Pidgin supports many features of these chat networks, such as file transfers, away messages, buddy icons, custom smilies, and typing notifications. Numerous plugins also extend Pidgin's functionality above and beyond the standard features.

to install pidgin type the following command on terminal

$ sudo apt-get install pidgin
To get latest version of pidgin

Ubuntu ships Pidgin but does not update it after a release (except for security issues and high-severity bugs). For those users who desire new releases of Pidgin, we have packaged Pidgin in a PPA. If you encounter problems with these packages, try building from source and report the bug.

To setup the PPA, copy-and-paste these commands into a terminal:

sudo apt-key adv --recv-keys --keyserver keyserver.ubuntu.com \ 67265eb522bdd6b1c69e66ed7fb8bee0a1f196a8

echo deb http://ppa.launchpad.net/pidgin-developers/ppa/ubuntu \ `lsb_release --short --codename` main | \
sudo tee /etc/apt/sources.list.d/pidgin-ppa.list

After doing this, open Update Manager, check for updates, and then install the newly available Pidgin packages.

Future Pidgin updates will show up in Update Manager along with the usual Ubuntu updates. The PPA will need to be re-setup only after upgrading Ubuntu.

This PPA is maintained by one developer, so please be patient. It often lags behind the source releases a couple of days.

Voice and video support is only built on Jaunty (9.04) and up.

3. Opera

Download

Browse to the folder where you put the downloaded file, assumes it is at desktop

$ cd Desktop

Desktop:-$ sudo dpkg -i opera*.deb

The second method is to download Opera from the Ubuntu repositories. This is probably the more trusted method, but many users prefer first method due to the fact that it can often be more up to date. . To install Opera use the following:

$ sudo apt-get install opera


pidgin 2.6.1 Call error Fixed

"Error creating session: Could not create the valve element"

I was trying to run new pidgin under my ubuntu 9.04 Jaunty jackapole. It took hell of time to add all necessary development modules. To compile pidgin with voice and video support you must need farsight2 development headers and it need some other packages, and it goes on. After all I managed to compile and install.
But when I start a new call, it will display an error
Error creating session: Could not create the rtp muxer element
Error adding stream.
The call has been terminated.

Error creating session: Could not create the valve element.

Nothing went fine, I decided to remove the package and I want to do a clean reinstall but I am not able to uninstall pidgin from my system.
Synaptic Package Manager, sudo apt-get remove --purge pidgin .... nothing happened.

Then once again I compiled it, then
issued command to uninstall the pidgin
'sudo make uninstall'

now it removed Pidgin completely from my system.

Then I setup the PPA, "copy-and-paste these commands into a terminal"

sudo apt-key adv --recv-keys --keyserver keyserver.ubuntu.com \ 67265eb522bdd6b1c69e66ed7fb8bee0a1f196a8

echo deb http://ppa.launchpad.net/pidgin-developers/ppa/ubuntu \ `lsb_release --short --codename` main | \
sudo tee /etc/apt/sources.list.d/pidgin-ppa.list

sudo apt-get install pidgin

Now it working fine.